上QQ阅读APP看书,第一时间看更新
How to do it...
The following procedure will guide you through the steps involved in performing a host customization:
- Log in to the vSphere Web Client and use the key combination Ctrl + Alt + 1 to navigate to the inventory home.
- At the inventory home, click on Host Profiles to view all the profiles already created.
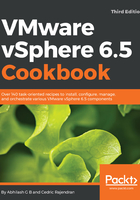
- Right-click on the Host Profile and click on Export Host Customizations...:

- On the Export Host Customizations window, click Save to save the file as a .csv file:

- Use a spreadsheet tool like Microsoft Excel to edit the contents of the file and supply the host-specific values.
- Right-click on the Host Profile and click on Edit Host Customizations...:

- On the Edit Host Customization wizard, select all the applicable ESXi hosts and click Next to continue:

- On the Customize hosts screen, click on Browse and select the host customization file. If the file selected is ready and is validated successfully, the same will be indicated. The wizard screen will show the values populated from the .csv file. Click on Finish to apply the customization:

- The Recent Tasks pane will show a task named Update host customizations complete successfully:
